

Removing Laitance From Screed
A Quick Guide for Self-Builders and Contractors
Laitance is a brittle surface crust that forms when the fine cement binder rises to the top of drying flow screed. This crust needs to be removed, using a single-head rotary floor sander machine and 16-grit carborundum disc, 5 to 14 days after the pour. Leaving the laitance layer in place guarantees the failure of your floor finish. Any primers or adhesives you apply will attach to this weak dust rather than solid screed, and leads directly to cracking and delamination.
Removing laitance from screed is absolutely necessary, and Buxton Flow Screeds has two decades of experience with every stage of flow screed installs. In this blog, we offer a detailed workflow for laitance removal.
Why Must You Remove Laitance Before Laying Floor Finishes?
Laitance not only slows down the drying process of your screed, but it also creates a weak bond between the screed and your chosen floor covering. This can lead to adhesion problems, where tiles or other flooring materials fail to stick properly, potentially causing costly damage and delays.
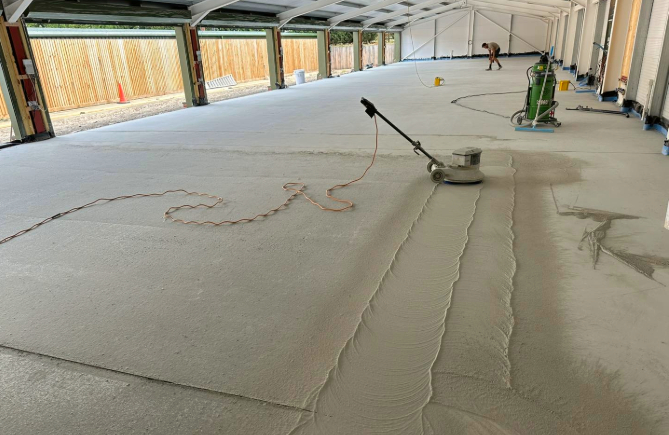
To avoid these issues, laitance removal should be completed before installing your floor finish. Read our guide on removing screed laitance.
What Equipment and Tools Do You Need to Remove Screed Laitance
You’ll need the following machinery to strip laitance cleanly down to solid aggregate:
Task | Recommended Machine | Accessory / Spec |
Main Floor Abrasion | Single-head rotary floor sander | 16-grit carborundum disc or diamond segment plate |
Perimeter & Edge Sanding | Shrouded 125mm angle grinder / Edge sander | Diamond cup wheel / 24-grit abrasive pad |
Dust Extraction | M-Class industrial dust extractor | Auto-pulse filter cleaning, integrated tool take-off |
Final Pore Cleaning | M-Class industrial vacuum | Rigid wand with rubber floor squeegee |
Moisture Verification | Carbide Method (CM) tester or Hygrometer box | Sealed testing chamber and calcium carbide ampoules |
How Do You Remove Laitance From Liquid Screed Step-by-Step?
Here’s a simple guide to help you get it right:
- Schedule laitance removal – This needs to happen between 5 and 14 days after the pour. If you sand before day 5 you could tear soft screed; if you wait till after 14 days the laitance crust has fully hardened, doubling machine time and disc wear.
- Set up dust extraction and sander – Mount a 16-grit or 60-grit carborundum disc onto a single-head rotary floor sander. Connect an M-Class industrial dust extractor directly to the unit before starting.
- Work the slab methodically – Work the sander in overlapping passes across the floor. Continue until you abrade the chalky surface skin and the solid aggregate is revealed beneath.
- Get rid of all the dust – Vacuum the floor thoroughly using an M-Class vacuum. Don’t attempt to dry-sweep, as this will push fine binder particles back into the open pores on the surface.
- Check the substrate – Check for a uniform, matt, aggregate-exposed surface across the whole slab before you move on to moisture testing or priming.
What Step Comes Immediately After Sanding Liquid Screed?
Removing laitance is a crucial step, but it’s not the only factor in achieving a flawless floor finish.
Moisture Testing:
Test moisture levels using a Carbide Method (CM) tester or an insulated floor hygrometer box sealed to the slab for a minimum of 72 hours.
For anhydrite screeds, moisture must read below 75% Relative Humidity (RH) or 0.5% moisture content by weight (w/w) before applying tile adhesive, resin, or levelling compounds.
If underfloor heating is installed, run a full heating commissioning cycle before taking final sign-off readings.
Choosing Your Primer:
Sanding opens the screed’s pore structure, which means you have a high-suction surface that requires priming. Most flow screeds need a two-coat application – a diluted first coat (typically 1:1 or 1:2 with clean water), followed by a neat second coat applied at right angles once the first has dried completely to film over the surface.
Work the primer into the substrate using a medium-pile roller or soft broom; don’t leave any puddles. Make sure that the final primer film cures to a tack-free finish before spreading floor levelling compounds or tile mortars.
Got a High-Volume Liquid Screed Pour Coming Up?
Work with a flow screed specialist that understands site logistics. We supply high-performance calcium sulphate and cementitious screeds, complete with scheduled mechanical laitance removal and full substrate verification testing.
Get in touch today to discuss your screeding requirements. Call 020 3369 3396 / 07590 625100


