
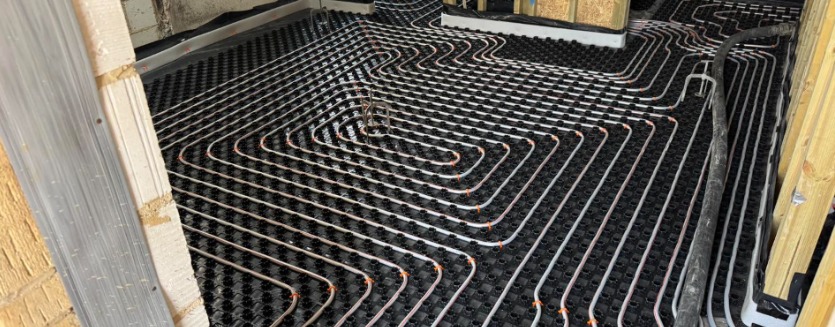
What is Wet Underfloor Heating?
Wet Underfloor Heating Installation and Liquid Screed – The Perfect Partnership
What is wet underfloor heating? It’s an invisible, whole-house heating system. By pumping warm water through flexible tubing embedded in your floor, it creates a gentle radiant heat that eliminates cold spots and the need for dust-trapping radiators.
UFH is hugely popular for modern renovations and self-builds because it operates at lower temperatures, saving you money while increasing comfort. We’ve put this guide together to show you exactly what to expect during the installation process and how to avoid common setup problems.
As a long-standing supplier and installer, Buxton Flow Screeds understands UFH inside-out. We don’t just ‘supply parts’ – we deliver a high-performing floor. Our installers ensure that your system is pressurised, tested, and poured with the right liquid screed for optimum thermal mass. We provide reliable foundation for your home’s heating.
Radiant Heat vs. Convection – The Science of a Warm Floor
To understand wet underfloor heating, it’s helpful to start with an understanding of how heat moves. Traditional radiators heat the air immediately around them, which then rises to the ceiling, cools, and drops back down. Wet UFH actually changes the physics of your home.
We install a network of polyethene pipes directly into your floor’s sub-structure. Once we encapsulate these pipes in liquid screed, the entire floor becomes a heat emitter. Because the heat is radiant, it warms objects and people directly rather than just the air. This creates a much more comfortable environment because the temperature at your feet is slightly warmer than at your head, which is exactly how the human body prefers it.
By using a manifold to regulate the flow, we can be sure that every corner of the room reaches the same temperature. You get a consistent, gentle heat that eliminates the ‘on-off’ cycling common with central heating.
Why Liquid Screed is the Perfect Partner for Your Heating Pipes
To get the most out of your wet underfloor heating, the material covering your pipes needs to do more than provide a perfectly flat surface. It needs to act as a high-performance heat conductor. At Buxton Flow Screeds, we recommend liquid screed because it’s designed to work in tandem with your heating loops, ensuring no energy is wasted.
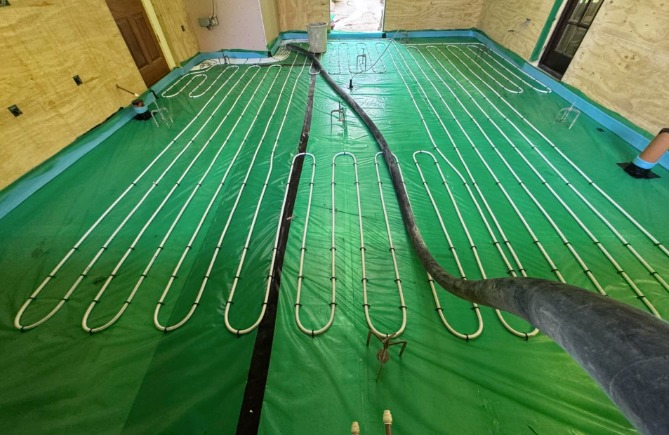
- Total Encapsulation – Because liquid screed is fluid, it flows effortlessly around every millimetre of the pipe. This eliminates air pockets, which act as insulators and block heat from reaching your room.
- Better Conductivity – Liquid screed has a much higher thermal conductivity than other materials. It allows the heat from the water pipes to pass through to the floor surface quickly and evenly.
- Rapid Response – A thinner, more conductive layer means your heating reaches the desired temperature faster, giving you better control and lower energy bills.
A Note on Restricted Heights
If your renovation project is tight on vertical space – perhaps you’re worried about door thresholds or matching existing floor levels – we have a solution. In these cases, we recommend a high-strength self-levelling compound. This can be laid significantly thinner while still providing a strong, heat-responsive finish for your UFH.
From Bare Subfloor to Warm Home – Your UFH Installation Schedule
One of the biggest questions we get at Buxton Flow Screeds is: ‘How long will my floor be out of action?’ Because we handle both the heating and the screed, we can streamline the workflow to keep your renovation moving fast.
Stage 1: The Setup (1 Day) – We install the high-performance insulation and the pipe circuits. We make sure every loop is perfectly spaced for even heat distribution.
Stage 2: The Integrity Test – Before we leave the site on day one, we pressurise the system. This gives you complete confidence that your heating is secure before it’s encapsulated.
Stage 3: The Pour (1 Day) – We pump the liquid screed over the pipes. It’s a clean, efficient process that provides a level finish without the mess of manual shovelling.
Stage 4: Walking on the Floor (48 Hours) – You’ll need to keep the windows closed and the floor clear for the first two days. After that, you can walk on it and continue with your wall finishes.
Stage 5: Drying Out – The screed will continue to release moisture over the following weeks. We provide clear instructions on when you can safely lay your final floor tiles or wood.
Build a Warmer Home with Buxton Flow Screeds
Now that you know the mechanics of how wet underfloor heating works, the next step is planning the installation. From the initial insulation layer to the final pressure test and the liquid screed pour, we focus on the details that will ensure you get the very best from your underfloor heating system.
Ready for a Reliable Floor?
We’ve been doing this for a long time, and we know exactly what it takes to get a screed-backed UFH system right. If you’re ready to experience the comfort of radiant heat, let’s get your project moving – call us for a free, no-obligation quote on 020 3369 3396/07590 625100


